
Reconnect a FireWire drive to a workstation
A drive pulled from an edit suite often arrives with its power supply and no data cable. Find the interface name on its enclosure and identify the port on the computer or expansion card that will read it.
Count pins at both ends
FireWire equipment in this catalog uses several connector shapes. A four-pin camcorder lead and a six-pin drive lead can both be described as IEEE 1394. Use a close photo of the socket or the equipment manual, especially when the equipment is already inside a rack and the lettering is hidden.
Check the host before buying another cable
Find out whether the operating system supports the host interface and the drive. Retain the original supply for a drive designed to use external power. If the workstation has only USB, identify a supported way to access FireWire before shopping for a cable with the right-looking ends.
Prepare for a one-time archive job
Before borrowing a workstation just for this drive, collect the enclosure model, the make of its power supply, the host operating system and the file system used when the drive last worked. Confirm that the destination disk has enough free space for the files you expect to copy. If the enclosure appears in the computer’s hardware list but no readable volume appears, note both findings. They point to different parts of the problem and are useful information for a technician. If the old drive holds the only copy, avoid accepting erase or initialization prompts during that first inspection.
Moving an audio interface between studio computers
Look up the interface manufacturer's list of supported operating systems and drivers for the receiving computer. Then check the port on the interface, the one on the computer and whether the interface uses its own power supply. The six-foot 10E3-01106 connects two six-pin FireWire 400 sockets. The nine-pin 10E3-99010BK is listed for a different connector arrangement. Once the host recognizes the interface, make a short recording on one input and play it back. That separates the question of a working FireWire link from the question of how the recording application routes its audio.
Moving a scanner without losing its original power arrangement
A scanner that worked beside a desktop can give few clues about which cable supplied data and which supplied power once everything is boxed. Photograph the original back panel before moving it, including any power connector, switches and transport-lock instructions. Check the scanner manual for its required host interface and where the original scanning software will run. At the new desk, allow enough clearance to open the lid and to route the cable without pulling on the FireWire socket. If the computer recognizes the interface card but the scanner does not appear, check the scanner’s documented startup sequence before replacing an otherwise correctly specified cable.
Compare parts for your setup
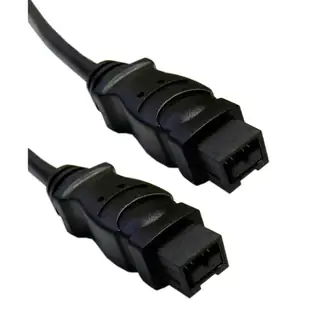
Firewire 800 9 Pin cable, Black, IEEE-1394b, 3 foot
10E3-99003BK
- Configuration
- 9 Pin
- Length
- 3 ft
Compare the 4-, 6- or 9-pin port at each end and verify that the computer supports FireWire capture. Measure the installed route against this 3 ft length.
Firewire 400 6 Pin cable, IEEE-1394a, 6 foot
10E3-01106
- Configuration
- 6 Pin
- Length
- 6 ft
Compare the 4-, 6- or 9-pin port at each end and verify that the computer supports FireWire capture. Measure the installed route against this 6 ft length.
Firewire 400 6 Pin to 4 Pin cable, IEEE-1394a, 6 foot
10E3-02106
- Configuration
- 6 Pin · 4 Pin
- Length
- 6 ft
Connect a MiniDV camcorder with a four-pin DV socket to a computer with a compatible six-pin FireWire interface.
Check the camera and host ends separately. A USB-only computer needs a compatible capture or FireWire interface.


