
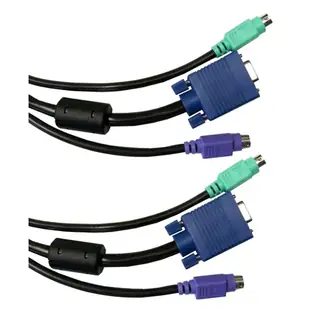
Identify a VGA and PS/2 KVM cable
An older KVM switch can share a monitor, keyboard and mouse among several computers. The loose bundle on the server cart may carry three connections for one computer, so trace it from the correct numbered bank on the switch.
What is in the bundle?
The listed six-foot cable combines an HD15 VGA connection with two Mini-DIN 6 PS/2 connections. Compare the connectors on the switch and computer with the individual ends in the listing. Some switches use proprietary combined sockets on one side, making an otherwise similar three-lead kit unsuitable.
Check one computer at a time
Label the keyboard and mouse branches as you disconnect the old set. After following the equipment’s connection procedure, select that computer and test the display, typing and pointer independently. A working picture tells you nothing about which PS/2 branch carries the keyboard.
Recognize a missing bundle versus a missing switch
An office cleanout may leave a single tied bundle with VGA and PS/2 ends but no box. That bundle cannot select between computers by itself. Look for the actual KVM switch and identify its console connections for the shared keyboard, monitor and mouse. Then count the computer-side banks that still need leads. For two computers, one six-foot kit may fill only one of those banks. Compare the vendor’s switch diagram with all the ends you have. This eliminates a second order when a replacement cord arrives and the other computer still has no path to the switch.
Reconnecting a legacy workbench after moving it
Bundle and label each computer's video and keyboard/mouse leads together before disconnecting the switch. The 10H1-30106BK carries VGA and two PS/2 connections. A loose purple or green plug found later tells you less than a label identifying the computer and its switch position. Check which ends must mate with the console and host ports on your particular KVM. If video follows the selected switch position but typing controls another computer, check the channel assignments for all three connections before assuming the keyboard failed. Follow the hardware manual when changing PS/2 connections.
Will the switch support the monitor you plan to reuse?
A spare VGA monitor may run at a different resolution from the screen originally used with the KVM. Check the switch’s documented display capabilities and each computer’s supported modes, then choose one all three support for the first test. Connect the monitor directly to one computer to establish a reference picture before inserting the switch and bundle. If the direct picture is clear but the switched picture is poor, inspect the selected cable path, connections and switch specification for that mode. This comparison is more informative than buying a longer replacement bundle on the assumption that every VGA connection performs identically.
A closer look at this part
KVM Cable, Black, SVGA and 2 PS/2, HD15 Male and 2 x MiniDin6 Male, 6 foot
10H1-30106BK
- Connector references
- HD15 Male · MiniDin6 Male
- Length
- 6 ft
Compare the monitor connector, both keyboard and mouse connections, and the switch’s computer-side socket layout. Measure the installed route against this 6 ft length.
